
Mastering the Critical Path: A Guide to CPM in Construction


Last Updated Aug 7, 2025
Ben Ashburn
Staff Trainer & Program Manager
22 articles
Ben Ashburn is a Senior Construction Education Trainer at Procore. After a successful career as a construction estimator — working his way up from estimating manager to senior estimator — Ben has spent the most recent part of his career in construction sharing his skills with other as a construction educator. Ben has an extensive background in construction education: He has been an assistant professor in the Department of Construction Science at Texas A&M, and lectured about estimating, scheduling, management, and other related construction topics at Murray State University. He has been a construction training and learning development partner with Procore since 2019.
James Hamilton
Writer & Producer
89 articles
James Hamilton is a writer based in Brooklyn, New York with experience in television, documentaries, journalism, comedy, and podcasts. His work has been featured on VICE TV and on The Moth. James was a writer and narrator for the show, VICE News Tonight, where he won an Emmy Award and was nominated for a Peabody Award.

While every task must be completed to complete a construction project, some tasks are more critical than others. It's crucial to be able to identify which activities must be finished before others can be started — and which can’t be delayed without setting back the whole project.
On a construction project, the critical path is the sequence of tasks with no float time and must be completed on time to avoid delays to the master schedule.
The Critical Path Method (CPM) is a systematic approach to scheduling that compares activities, especially those that happen concurrently, and prioritizes them in order of their impact to the schedule. This process is used to find the critical path. CPM is one of the most common planning techniques in construction.
In this article, we explore the importance of finding the critical path, how to use CPM in scheduling, and how it is used alongside other planning methods.
Learn More: The Ultimate Guide to Construction Scheduling
Table of contents
What is the critical path?
On most jobsites, numerous tasks are happening at the same time: Contractors may be working on HVAC, plumbing, electrical and landscaping concurrently. While all those activities need to be completed, not all of them are critical to keeping the project on schedule.
Critical activities are those in which a delay results in a delay to the master schedule. The rest of the activities (i.e., non-critical tasks) have some flexibility — they can start earlier or finish later without impacting the overall schedule.
The critical path is the longest sequence of consecutive tasks with zero float or flexibility between them. Identifying this sequence can help contractors prioritize the allocation of resources, including equipment, materials, and labor.
Identifying the Critical Path
Project managers use the Critical Path Method to calculate the float time for each task by defining its earliest and latest start and finish dates. The scheduler uses CPM to organize this information and sequences the tasks in a chart, clearly showing the relationship and dependencies between tasks. Initially, figuring out which tasks need to be done often happens by making a work breakdown structure (WBS), a common organizational system for complex projects.
CPM depends on accurate task durations, so it is most often used for projects where most of the tasks are familiar. Often, durations are easy to estimate, simply because construction companies and contractors have personal experience with or historical data on most activities.
The Critical Path Method doesn’t help determine a task’s duration in the case of rare or uncertain activities. However, CPM can be used in conjunction with other scheduling methods – such as PERT – to develop probabilistic time estimates.
Stay updated on what’s happening in construction.
Subscribe to Blueprint, Procore’s free construction newsletter, to get content from industry experts delivered straight to your inbox.

The Critical Path Method: Steps to Find the Critical Path
Construction scheduling software can simplify the documentation of organizing, visualizing and sharing schedules in ways that clearly identify the critical path. However, anyone can use the critical path method without scheduling software to identify the critical path in a sequence of concurrent activities.
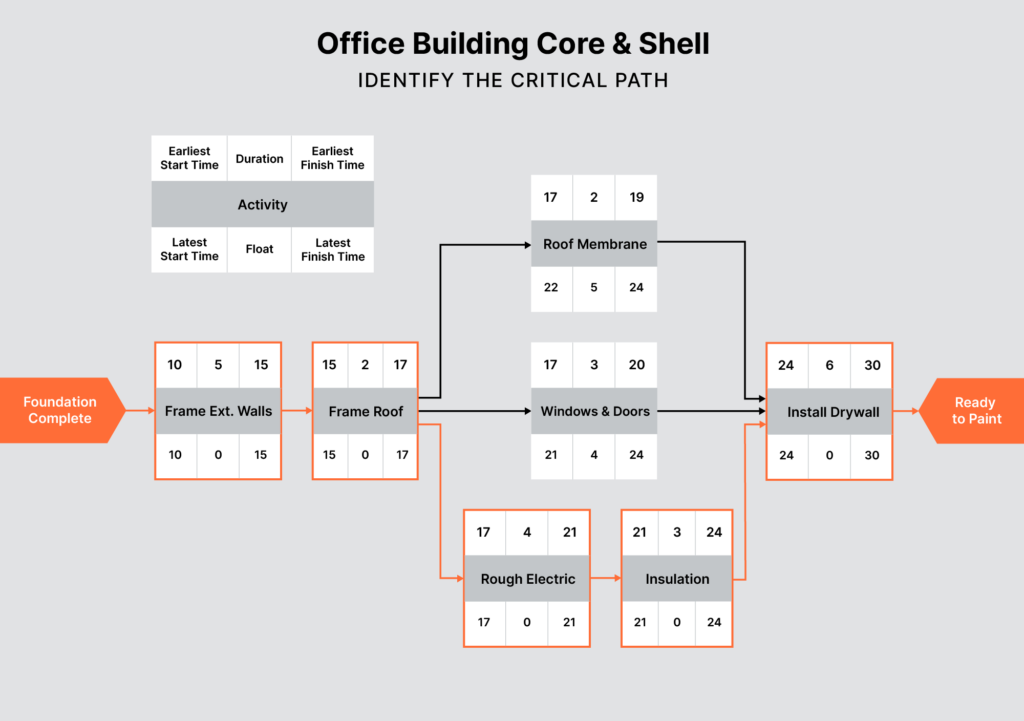
To illustrate these steps, we will use a simple commercial office project as an example and create a CPM schedule for the “Core and Shell” stage of the project.
Preparing the Grid Key
When creating a visual organization chart, each activity will be represented by a grid, ultimately displaying the relevant schedule information about each activity.
The placement of each item in the grid can vary based on the scheduler’s preference. For this article, we are using a 9-box grid with the center row merged to display the activity name. However, to save space many schedulers will assign each activity a letter (e.g. A, B, C) and provide a key that lists all activities with their corresponding letter. What is most important is that everyone who uses the schedule can easily identify the element represented by each number in the grid.
Here is the grid key we will use for this article:
- Top Left: Earliest Start Time (ES)
- Top Center: Task Duration
- Top Right: Earliest Finish Time (EF)
- Center (Merged): Activity Name
- Bottom Left: Latest Start Time (LS)
- Bottom Center: Float
- Bottom Right: Latest Finish Time (LF)
1. Identify all tasks.
Tasks can be listed or pulled directly from the project’s work breakdown structure (WBS). Tasks should be definable and measurable.
For example, a contractor could use CPM to plan a segment of work, such as completing the interior of an office building. They would start by finding all the tasks between the preceding milestone (completing the foundation) and the subsequent milestone. They might list the following tasks:
- Frame exterior walls
- Frame the roof
- Install windows and doors
- Install the roof membrane
- Install rough electric
- Install insulation
- Install drywall
2. Organize tasks in sequential order.
Identify the first task needed to start the project or segment. Then, put the rest of the tasks in order by asking the same questions about each of them:
- What needs to happen before this task?
- What can be started after this task?
- What tasks can be done at the same time?
Sequence the grids from left to right and connect with arrows in the order they need to be completed. Vertically align tasks that can be done at the same time.
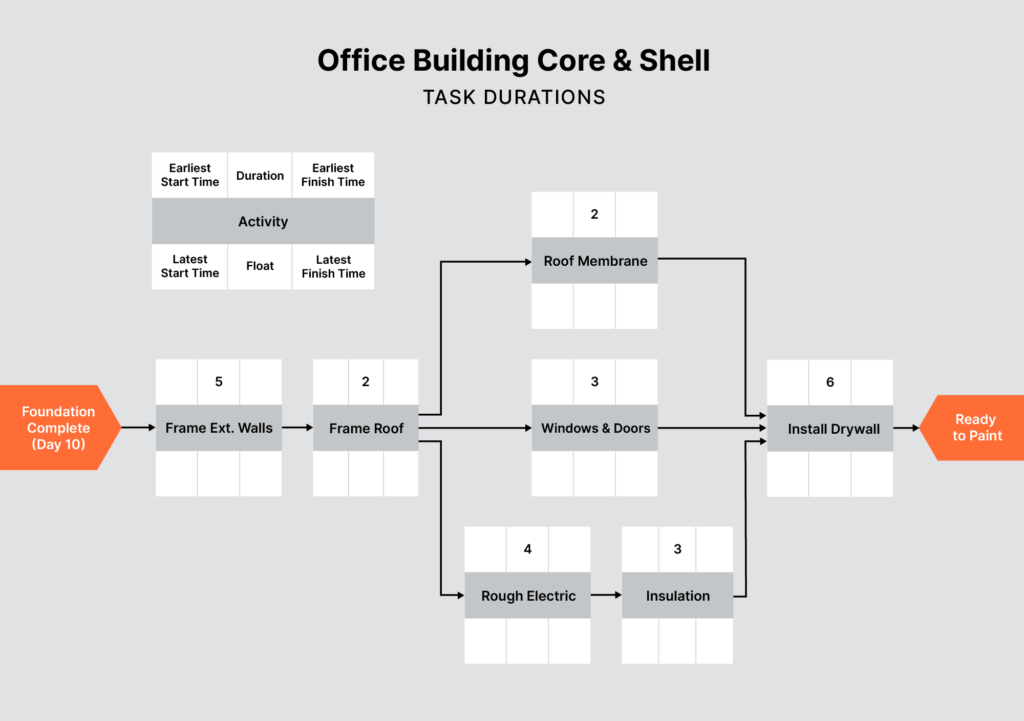
3. Add the duration for each task.
Durations should be based on past experience, historical data, and the availability or known lead times of materials and labor. For tasks with a lot of uncertainty, the PERT formula can be used to find a probabilistic time estimate. The unit of time should be the same across all activities – typically expressed in days or weeks.
Put the duration in the top middle square.

4. The Forward Pass: Determine earliest start & finish times.
Determine a task’s earliest start date by considering when its preceding tasks can be completed. Determine the earliest finish time by factoring in the task’s duration from its earliest start date. Move forward in the schedule from left to right and repeat for each task.

The earliest start date is written in the upper left square and the earliest finish date goes in the upper right square.
Framing the exterior walls can start on day 10 and will take five days (including day 10). The earliest it is expected to end is day 15.
That means framing the roof can’t be started until day 15, at the earliest. It takes two days, so its earliest finish date will be day 16.
Framing the roof must be completed before work can begin on three other tasks: the roof membrane, windows and doors, and rough electric. The earliest start date for each of these tasks would be day 17. Since they can be worked on concurrently, they are stacked vertically and the earliest each task can be finished is found based on its respective duration.
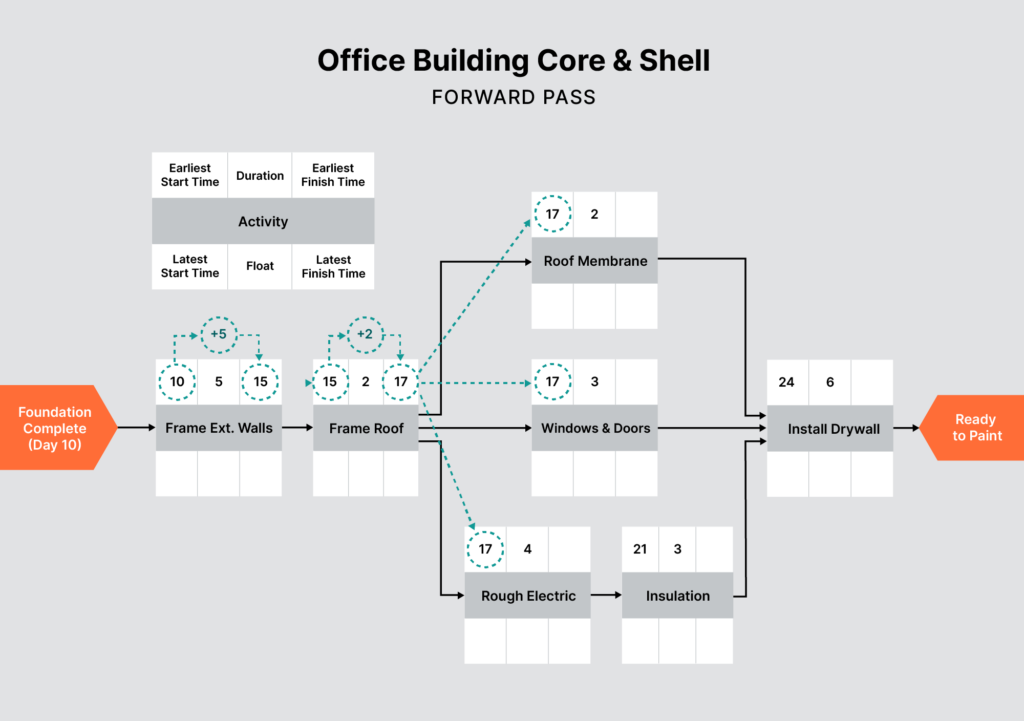
Once rough electric is done, insulation can begin. The earliest this can happen is day 21. Since insulation takes three days, it won’t be done until day 23.
Drywall is started after completing all of the insulation, windows, doors and the roof membrane. Even though the roof membrane and windows and doors could be done earlier, insulation isn’t finished until day 23. The earliest the drywall can be started is day 24.
This means the earliest this segment of work can be completed is day 29.
5. The Backward Pass: Determine latest start & finish times.
So far, the process has moved left to right in what is called a forward pass. Now, the process reverses for a backwards pass. Start on the right and move backwards through the schedule.
A task’s latest finish time is determined by the latest start time for its successive task. This is written in the bottom right square.
A task’s latest start time is found by subtracting its duration from its latest finish date. This is written in the bottom left square.
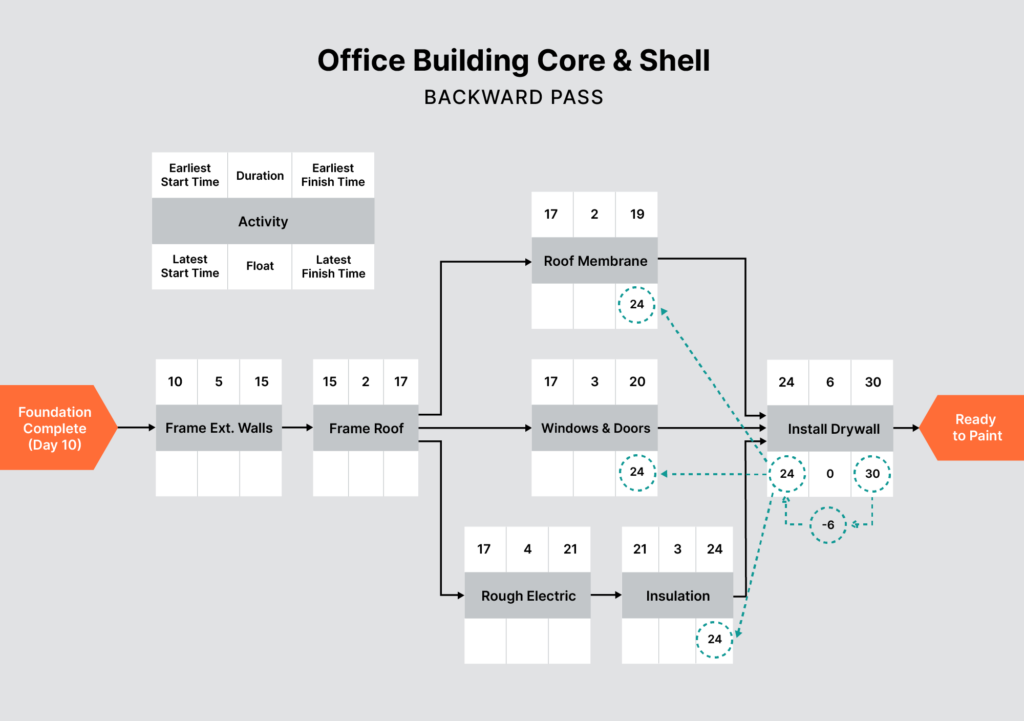
Installing the drywall needs to be done on day 29 at the latest. It takes six days (including day 29), which means its latest start time is day 24.
In order for work on the drywall to begin on day 24, the latest finish days for the roof membrane, windows and doors, and insulation will all be day 23. Each task's respective latest start date is found by subtracting its duration from day 23.
For insulation to begin on day 21, rough electric must be done on day 20. Rough electric’s latest start and finish date are filled in as follows:
The latest framing the roof can be finished is day 16, so that rough electric can begin on day 17. The earliest start date for framing the roof would be day 15. Repeat for framing the exterior walls.
6. Calculate float time.
Determine the float time for each task by subtracting the earliest start date from the latest.
According to our grid key, the float time will go in the bottom middle square.
A float of zero indicates that the task is critical.
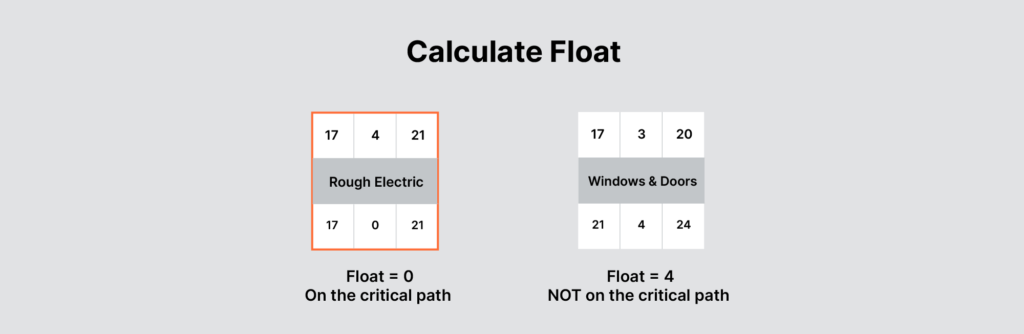
For example, rough electric has zero float, so it must be started on day 17 and finished on day 20, or the next task will be delayed.
Other tasks have float time, which makes them non-critical. Windows and doors has a float time of four days (21-17). That means windows and doors can be started any time between day 17 and 21 and still be done in time for the drywall to be started without delay.
7. Identify the critical path.
Find the longest possible sequence of tasks with zero float days. This is the critical path, meaning all these actions can’t be delayed without changing the schedule. If you’ve followed the process correctly, the critical path will reveal itself. Two concurrent tasks cannot both have zero float.
The Benefits of CPM
Even beyond effectively finding the critical path, CPM is helpful in many ways.
- Visualization: The diagram is easy to understand and illustrates the relationships between tasks, which can increase communication and urgency.
- Anticipate delays: By highlighting the critical path, schedulers can choose to build in time for delays in order to keep potential delays with the critical tasks from impacting the project’s completion date.
- Respond to delays: When issues arise that affect the timeline, CPM’s visualizations quickly and effectively help contractors understand the severity of the issue and whether to ask for more time or compensation, if allowed by their contract.
CPM: A Key Piece of the Planning Puzzle
CPM is one of the most common planning techniques in construction. Even when it isn’t a project manager’s personal go-to method, it’s important to be familiar with it as they will almost certainly encounter it when working on other people’s projects.
There are many types of planning methods. CPM is a type of “push” planning, which starts by looking at the beginning of a project, moves forward, and can allow a project manager to quickly and effectively create schedules for projects that are familiar and easy to anticipate. In contrast, pull planning starts with an end goal and moves backwards.
A successful pull planning session can increase team buy-in and the quality of planning. Effective project managers use both push and pull planning to refine the schedule and confirm that the sequence and durations are accurate and up-to-date.
Was this article helpful?
Scroll less, learn more about construction.
Subscribe to The Blueprint, Procore’s construction newsletter, to get content from industry experts delivered straight to your inbox.
By clicking this button, you agree to our Privacy Notice and Terms of Service.
Categories:
Written by
Ben Ashburn
Staff Trainer & Program Manager | Procore Technologies
22 articles
Ben Ashburn is a Senior Construction Education Trainer at Procore. After a successful career as a construction estimator — working his way up from estimating manager to senior estimator — Ben has spent the most recent part of his career in construction sharing his skills with other as a construction educator. Ben has an extensive background in construction education: He has been an assistant professor in the Department of Construction Science at Texas A&M, and lectured about estimating, scheduling, management, and other related construction topics at Murray State University. He has been a construction training and learning development partner with Procore since 2019.
View profileJames Hamilton
Writer & Producer
89 articles
James Hamilton is a writer based in Brooklyn, New York with experience in television, documentaries, journalism, comedy, and podcasts. His work has been featured on VICE TV and on The Moth. James was a writer and narrator for the show, VICE News Tonight, where he won an Emmy Award and was nominated for a Peabody Award.
View profileExplore more helpful resources
Mastering Construction Resource Management: Strategies for Success
Completing construction projects successfully requires the careful management of various resources: labor, materials, equipment, money, time and information. Since these resources are finite, allocating them wisely is crucial for minimizing...
Cost-Loaded Construction Schedule: Analysis, Risks & Benefits
Both scheduling and cost control are make-or-break aspects of construction projects, but in many cases the two areas are kept very separate from one another — the project scheduler and...

Understanding the Last Planner System in Construction
Construction scheduling is a complex process affecting multiple stakeholders. Increasing accuracy and collaboration with trade partners when scheduling construction work can positively impact on-site workflow and efficiency. The last planner...

Forensic Schedule Analysis: Unlocking Insight Into Project Delays
Though construction sites may sometimes look like a large collection of machines, ultimately, it’s people who get things built. However, people aren’t perfect, and delays happen all the time —...
Free Tools
Calculators
Use our calculators to estimate the cost of construction materials for your next project.
Templates
Find a template to help you with your construction project tasks.
Material Price Tracker
Get the latest U.S. retail prices and view historical trends for common building materials.
Glossary
Explore key terms and phrases used in the industry.